Deploy your Next.js website to Github Pages
Andrianina Rabakoson / March 15, 2022
9 min read
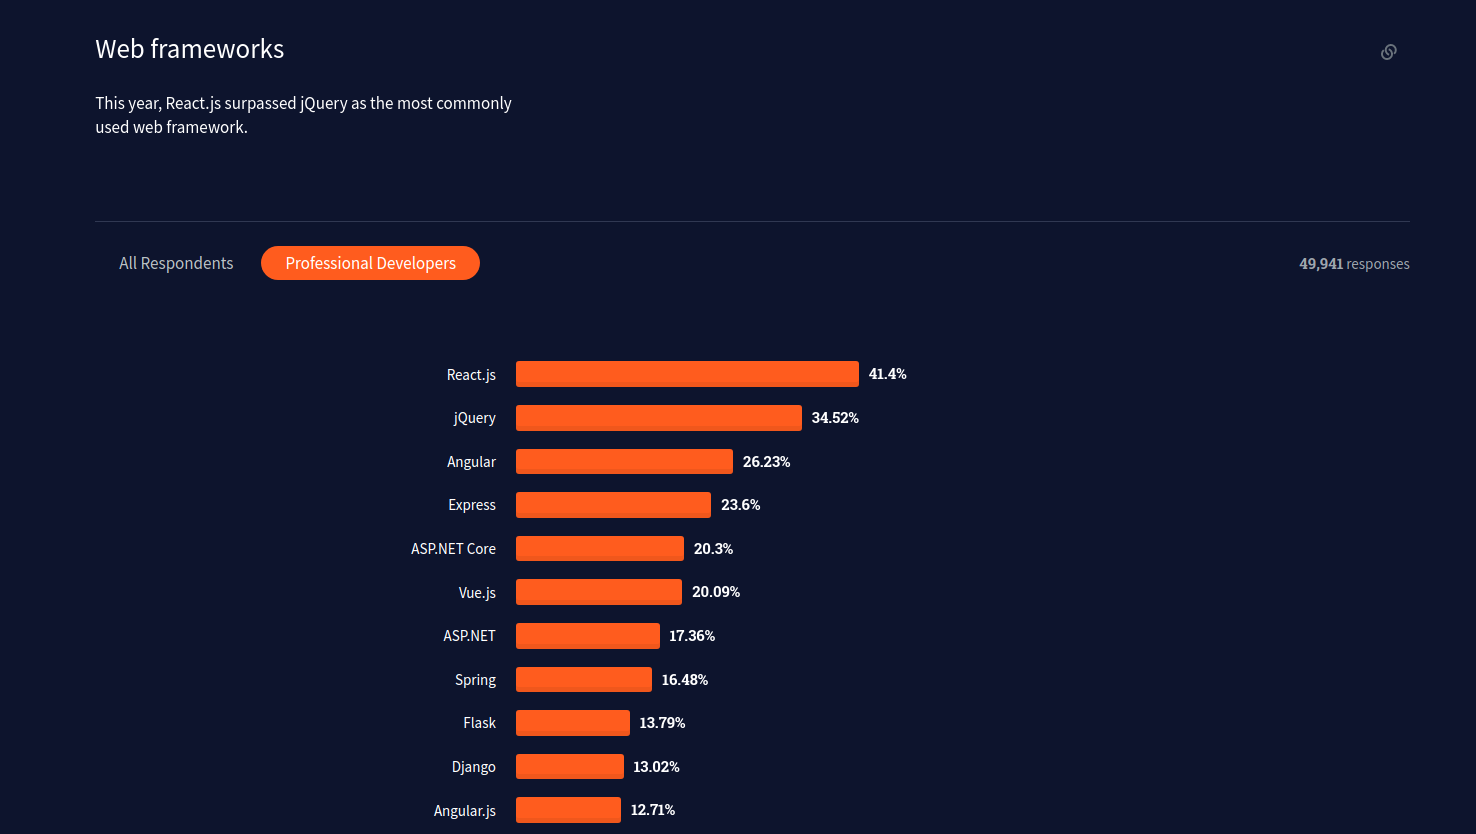
The 2021 Stackoverflow developer survey revealed the massive adoption of Meta's React.js open source library within the frontend industry.

In the meantime, developers started gathering maximum best practices on core web vitals to boost the performance of their websites and get better search engine optimization.
However, this is a lot of code to maintain that you are tempted to create a superset of React.js yourself to continue implementing those best practices across all of your websites.
Thankfully, some group of engineers from Vercel made and maintains all of this for us. Meet Next.js, the React Framework for production. Next.js is a static site generator that seats on top of React.js and offers performance out of the box. It has features such as :
- File-system routing as opposed to the React router
- Image Optimization out of the box
- Static-site generation and server-side rendering
- Code splitting and Bundling
- API Routes
And much more with Zero configuration. Next.js was then the way to go for people who cares a lot about performance.
Currently, the Vercel platform offers the simplest method of deploying your Next.js app to the internet, but it is not without its shortcomings.
Thanks to the Vercel team, they thought about us and added the export feature to the Next.js Framework.
next export allows you to export your Next.js application to static HTML, which can be run standalone without the need of a Node.js server.
In other words, it allows us to deploy our Next.js website to Github pages that has no certificate problems, is always free, is fully flexible, has no data owned by third parties and is developer friendly. Thank you Vercel 🥳🥳🥳.
Nevertheless, there is no such thing as perfection. It is recommended to only use next export if you don't need any of the unsupported features requiring a server. That is the purpose of this article where we will go through all the steps of configuring your Next.js website to mimic the normal Vercel deployment on GitHub Pages, which reflects how I made this entire portfolio website.
Table of Contents
- Prerequisites
- Project setup
- Continuous integration
- Fixing links
- The public folder
- Environment variables
- Image Optimization
- Conclusion
Prerequisites
- Have and LTS version of Node.js installed on your computer
This command should output a version number.
$ node --version
- Make sure you have npm installed (which should be after installing node.js)
$ npm --version
- Have a text editor ready on your computer, I am using Visual Studio Code
- Install git on your computer and follow the setup instructions guide
$ git --version
- Log in or create a Github account
Project setup
Create a Next.js website with TypeScript (typescript is optional).
$ npx create-next-app --typescript
cd into your newly created Nextjs project and open with your editor.
In your package.json file, add the export script into the scripts section.
"scripts": {
    "dev": "next dev",
    "build": "next build",
+   "export": "next export",
    "start": "next start",
    "lint": "next lint"
  },
In the pages/index.tsx or pages/index.jsx of your project, replace the <Image /> component to legacy <img> html tag and remove the import.
- <Image src="/vercel.svg" alt="Vercel Logo" width={72} height={16} />
+ <img src="/vercel.svg" alt="Vercel Logo" width={72} height={16} />
- import Image from "next/image";
In your /public folder, place a .nojekyll file to disable Github Pages from trying to create a Jekyll website.
Now run the following commands.
$ npm run build
$ npm run export
These commands should not output any errors. Note that for already big next projects, the export command outputs errors if you are:
- using getInitialProps in your project
- using getServersideProps
- returning a
fallbacktotruein your getStaticPaths
Continuous integration
Now that you have no error output, Put a deploy.yml file in a .github/workflows/ folder you will create in your root directory. Below is the content of the deploy.yml file. : (pay attention to indentation)
name: Node.js CI

on:
  push:
    branches: [main]

jobs:
  build:
    runs-on: ubuntu-latest

    strategy:
      matrix:
        node-version: [12.x, 14.x, 16.x]
        # See supported Node.js release schedule at https://nodejs.org/en/about/releases/

    steps:
      - uses: actions/checkout@v2
      - name: Use Node.js ${{ matrix.node-version }}
        uses: actions/setup-node@v2
        with:
          node-version: ${{ matrix.node-version }}
          cache: 'npm'
      - run: npm i
      - run: npm run build
      - run: npm run export

      - name: Deploy 🚀
        uses: JamesIves/github-pages-deploy-action@v4.2.5
        with:
          GITHUB_TOKEN: ${{ secrets.GITHUB_TOKEN }}
          branch: gh-pages # The branch the action should deploy to.
          folder: out # The folder the action should deploy.
Now create a github repository for your new Nextjs project. Commit your local changes and push them to your github repo.
$ git add .
$ git commit -m "Initialize repository and CI workflow"
$ git remote add origin <your-github-repo-url>
$ git push -u origin main
Have a look at the Actions tab in your Github repository to see the workflow running. What this action does is described in the deploy.yml file we just created and it will always fire up whenever you push to the main branch of your remote repository.
Wait until all the jobs have been checked off. Now you have one extra branch gh-pages created by the workflow to host your static files from the out/ folder.
Go to settings > pages and make sure you have your gh-pages branch selected for the github pages source.
If not, run your workflow again in the Actions tab. Now your site is deployed to Github pages and you can access it via <your-github-username>.github.io/<your-repo-name> and it looks ... horrible 🤣.

Where them CSSes at? What just happened is that Next.js looks for your static assets from the base url but our github pages website has a repo-name suffix attached to it so it can't find neither the js nor the css files.
Fixing links
From Nextjs version 9.5+, we can configure a custom assetPrefix and Next.js will automatically use your prefix in the scripts it loads.
To do so, create or go to your next.config.js file and add the following.
+ const isProd = process.env.NODE_ENV === 'production'

module.exports = {
   reactStrictMode: true,
+  basePath = isProd ? '/<your-repo-name>' : '',
+  assetPrefix = isProd ? '/<your-repo-name>' : ''
}
Note the basePath value we added which Next.js also uses as prefix for links with next/link components we might add later to the website.
Push your changes again to the main branch repo after committing your changes. The workflow will then automatically rerun the deployment scripts and update your deployed website.
The public folder
Now we believe we are done with links, but will find out later that assets originating from the public/ folder will still not be visible in Next.js.
Next.js will automatically use your prefix in the scripts it loads, but this has no effect whatsoever on the public folder.
Therefore, the prefix for these assets has to be handled manually. Like for images :
const assetPrefix = '/<your-repo-name>';

<img
  src={`${assetPrefix}${src}`}
  alt={alt}
  width={width}
  height={height}
  className={className}
></img>;
Fonts :
@font-face {
  font-family: 'IBM Plex Sans';
  font-style: normal;
  font-weight: 100 900;
  font-display: optional;
  src: url(/<your-repo-name>/ibm-plex-sans-var.woff2) format('woff2');
}
And everything laying in the public/ folder. It now becomes a big problem because when our repository name changes, we have to update everything referencing the value while hoping not to miss any.
Environment variables
First rule of coding is to never hard code changing values. Keeping the first rule in mind is the second. We should consider using global variables or even environment variables.
We can benefit from those environment variables by just making a little modification to our deploy.yml file :
...
  - name: Use Node.js ${{ matrix.node-version }}
    uses: actions/setup-node@v2
    with:
      node-version: ${{ matrix.node-version }}
      cache: 'npm'
  - run: npm i
  - run: npm run build
+   env:
+     NEXT_PUBLIC_BASE_PATH: /<your-repo-name>
  - run: npm run export
+   env:
+     NEXT_PUBLIC_BASE_PATH: /<your-repo-name>
...
and reference the value by its name in the next.config.js file :
- const isProd = process.env.NODE_ENV === 'production'

module.exports = {
   reactStrictMode: true,
-  basePath = isProd ? '/<your-repo-name>' : '',
-  assetPrefix = isProd ? '/<your-repo-name>' : ''
+  assetPrefix = process.env.NEXT_PUBLIC_BASE_PATH || '',
+  assetPrefix = process.env.NEXT_PUBLIC_BASE_PATH || ''
}
As well as in all files having an <img> tag, but it is recommended to create a custom <Image /> component in a components/ folder in the root directory and use this component all over the project.
import React from 'react';

const Image = ({ src, alt, width, height, className }) => {
  return (
    <img
      src={`${process.env.NEXT_PUBLIC_BASE_PATH || ''}${src}`}
      alt={alt}
      width={width}
      height={height}
      className={className}
    ></img>
  );
};

export default Image;
Image optimization
Now that all of our images display correctly across the entire website and environment variables saved us from sleepless nights of production debugging, it is time to tackle image optimization because Nextjs automatically optimizes them at runtime with Vercel so we should mimic the same functionality.
Run the following command to install next-optimized-image package.
$ npm install next-optimized-images
Enable the plugin in your next.config.js file:
+ const withPlugins = require('next-compose-plugins');
+ const optimizedImages = require('next-optimized-images');

+ module.exports = withPlugins([
+  [optimizedImages, {
+    /* config for next-optimized-images */
+  }],
   reactStrictMode: true,
   assetPrefix = process.env.NEXT_PUBLIC_BASE_PATH || '',
   assetPrefix = process.env.NEXT_PUBLIC_BASE_PATH || ''
+]);
You can see the configuration Section of next-optimized-images for all available config options.
Conclusion
Deploying your Next app to GitHub Pages is not the most intuitive way of doing it, and by far. Vercel would offer the one click deploy option every normal people would use but I don't write articles for normal people :). Nonetheless, taking this challenge taught us some really important aspect of software develoment, that is, mastering CI workflows a bit and factoring our code to prevent bugs (but not switching to dark mode :)). I hope this article helped his readers a lot and please do not hesitate to create an issue or make pull requests on this article, I appreciate any contributions.